Save Me a Seat centers around two characters that are in the same 5th-grade class at Albert Einstein Elementary School in Hamilton, New Jersey. Ravi is “just off the boat” from Bangalore, India. His dad has been transferred. Joe is all American. He has APD (Auditory Processing Disorder) which causes him to not be able to filter out noises to concentrate on his school work. APD is also the reason Joe doesn’t have friends. The story is told in alternating chapters between these two characters.
The problems for both boys begin to escalate. First, Joe’s mother gets a job as a lunchroom monitor. She completely embarrasses Joe on the first day of school by blowing him a kiss across the lunchroom. Ravi tells his family that his teacher thinks he needs extra help because no one can understand his English.
Add in a bully…Dillon teases Joe every chance he gets. He steps on his earplug. He gives him a hard time with his mother. Then he draws an insulting picture that shows everyone wearing a shirt that says “I’m with stupid.” Joe is in the picture as well wearing a shirt that says, “I’m Stupid.”
Ravi thinks he will sit with Dillon at lunch and the two will become fast friends. Instead, Dillon’s true colors show up. He tricks Ravi into eating beef and calls him Curryhead. Ravi races out of the cafeteria. He is disheartened that he is not part of the popular crowd like he had been in India. Ravi also realizes that in the past he was like Dillon, teasing the underdog.
Will these Ravi and Joe become friends? Will Dillon change? Read Save me a Seat to find out.
Activities for Save Me Seat
Novel Study Samples
Check out the novel study with these sample activities:
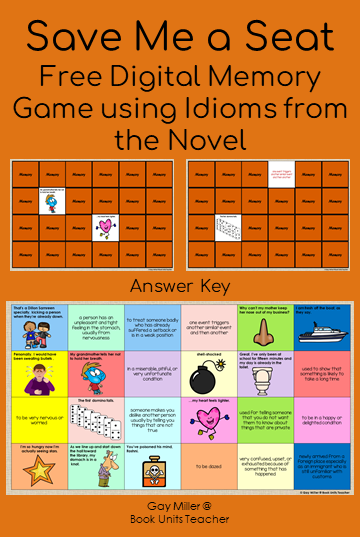
The object of the game is to get the most matches. A match is an idiom on one card/space and its meaning on a different card/space. The meanings are in red font and the idioms are typed in black with accompanying pictures.
The youngest player goes first.
On a turn, a player deletes 2 cards to see what is underneath. If the definition and idiom match, the player earns a point. The player then takes another turn, by deleting two cards. The player continues until the player misses.
3. When there is a miss, click the undo arrow twice to place the cards back on the gameboard. That player’s turn ends – and all players try to remember which cards were turned over for future matches.
4. The game continues until all cards have been matched.
5. The winner is the player with the most matches.
This link goes to a Google Slide. Make a copy to your Google Drive to make the slide editable for play.
This is a sample from a professionally created audiobook that can be purchased. Even if you don’t use the audiobook with students, using this sample is great to let students hear Ravi’s accent. The excerpt runs from pages 8 to 28.
A Special Treat
I love when books lend themselves to a classroom food activity. This book screams food. The recipes in the back of the book are terrific, but most teachers don’t have ovens in their classrooms. Here is a classroom-friendly version of apple crisp.
Ingredients Needed for One Serving
rolled oats (2 Tablespoons)
pinch ground cinnamon
plain flour with a pinch of salt (1 1/2 Tablespoons)
pumpkin and sunflower seeds (1 teaspoon)
olive oil (1 1/2 teaspoons)
honey or maple syrup (1 teaspoon)
canned apple pie filling (1/3 cup)
Line the ingredients up along a counter. All students create their own treat.
Provide students with a bowl. Students begin by placing each topping ingredient into the bow. Students stir the ingredients to make a crumbly granola-like mixture. The apples go in last. Yum!